Friday 21 December 2012

X++ code to define OR conditions in QueryBuildRange for a same field in a simple way

This blog post is show how to apply OR conditions in query ranges in a simple way on a same field in a table.

For example let's take a very simple select statement:
select * from CustGroup where custGroup.CustGroup == '10' || custGroup.Group =='20';

We can of course achieve the above by using expression in query ranges (MSDN) but as it has lot of specifications which needs to be followed (Axaptapedia)  and also in situations when we do not know how many values we want to pass in the range, the above approach can be a nightmare.

However there is a simple way also: Just add range and assign value on the same field multiple times as shown below:
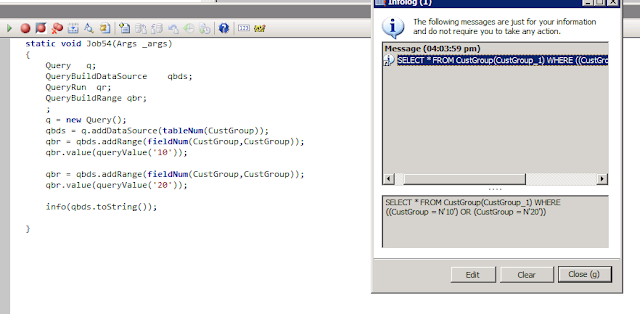

Query   q;
QueryBuildDataSource    qbds;
QueryRun  qr;
QueryBuildRange qbr;
;
q = new Query();
qbds = q.addDataSource(tableNum(CustGroup));
qbr = qbds.addRange(fieldNum(CustGroup,CustGroup));
qbr.value(queryValue('10'));
 
qbr = qbds.addRange(fieldNum(CustGroup,CustGroup));
qbr.value(queryValue('20'));
 
info(qbds.toString());

 The resultant select statement can be seen in below image.


Well, there are some points to remember when taking the above approach:

1. Add range on the field every time you want to have a new value in OR condition. If you apply the range only once and assign the value multiple times then system will pick the value which is assigned in the last statement something like the below image:


2. You can use the same queryBuildRange variable to assign the range multiple times. Even if you use different queryBuildRange variables system will apply it correctly. It also works without a queryBuildRange variable, you can directly apply range on QueryBuildDataSource object (this is shown in the last image).


The above code is useful in situations which I talked earlier, when you are getting the range values at run time from some list,map or may be another query. We can add ranges on the same field inside a while loop which creates the corresponding OR conditions in the resulting select statement, a sample of such code is shown below where I created a list having the customer group values on which I want to assign in the OR condition.


Thanks!!!


Wednesday 1 August 2012

AX2012: X++ Code to verify active inventory dimensions on an item


Recently I came across a situation where I needed to validate if the inventory dimension "PalletId" is active on an item or not. After a little digging here and there, came across this piece of standard AX code to identify if an inventory dimension is active or not. It is always good to re-use standard AX code instead of writing our own logic. This helps in maintaining the quality of the code.


   InventTable     inventTable;
   InventDimParm   inventDimParm;
   ;
   inventTable   = InventTable::find('1000');
   inventDimParm =  InventDimParm::activeDimFlag(InventDimGroupSetup::newInventTable(inventTable));
   if(inventDimParm.WMSPalletIdFlag)
   {
       info("Pallet Enabled");
   }

Similarly we can validate other inventory dimensions as well.


Thursday 14 June 2012

AX2012 : X++ code to access marked records on a form

In AX2012 there is a default mark check-box on forms showing data in grid, which allows user to mark some/all records. There are situations where we need to identify which records are marked by user and do some processing on them.

This is a short post to show how to access marked records on a form in AX2012.

I have created a button on "Production order" form, which shows the marked records when it is clicked. In order to do this, we need to:
1. Add a new button on the form.
2. Set property "MultiSelect" to Yes.
3. Override the clicked method of the button and code as shown below :


Inside the for loop you can write the logic which you want to process.


Tuesday 12 June 2012

Use edit method to mark/unmark all records

In continuation to my previous post (Edit method - I), I'll now use edit methods to mark all and unmark all the records of a form. It is a very common requirement to have such ability on forms.
In this post we'll use the edit method created in previous post (Edit method - I) and continue to create new buttons on customer details form to mark all and unmark all records.

To achieve this,we'll be doing the following:
1. Create new buttons on customer details form to mark all and unmark all records.
2. Create new functions on customer details form to mark all and unmark all records.

Let's start:

1. Create 2 new buttons on the customer table form, and change their text property to "Mark All" and "Unmark All" respectively. The CustTable form design should look as shown below:

2. Now we create a new function on this form to mark all the records. Let's name this function as PAMarkAll. We traversed through all the records one by one using a while loop and called the edit method for each record to mark it. The code should look like:

In the above code, we have declared a variable of type custTable which will help us to traverse through all the records shown on the form.
Next we initialize it with the first record using
          custTable_ds.getFirst() function.
Then we start the while loop.
Please note the way we have called the edit method. The first parameter of the edit method signifies that the value is changed, the second parameter is the custTable variable which we are using to iterate the records on the form, the third parameter is to signify that value returned  from the edit method needs to be turned on.
After marking the currently selected record we will get the next record using
        custTable_ds.getNext() method.
The above loop will be executed till the next record is found.
At last we used element.redraw() method to redraw the form.

3. In the similar way we create a new function to unmark all the records, the only change is that we need to pass false as the third parameter in the edit method call. The function to unmark all the records should look as below:


4. The functions that we created above should be called when we click the mark all and unmark all buttons. To do this we override the clicked method of both the buttons. The clicked methods should look like:


Now that we are done with the modifications required to mark all/unmark all the records, let's open the customer master form and then play with mark all and unmark all buttons. On clicking mark all button we'll notice that all the records are marked.


On clicking Unmark all button we notice that all the records are unmarked.


So in the post we saw a good example where we can use edit methods in real time situations. In my coming posts, I'll show how we can use combination of edit and display method to achieve some good features to enhance user experience on Dynamics Ax forms.


Sunday 3 June 2012

How to use edit methods to mark records


In this post I’ll show how we can use edit methods to mark records on a form and display all the marked records on a click of a button.

To achieve this we’ll :
1. Use a map to store the references of marked records. (PS: we can use other data types, like container , array, lists. We can also use temporary tables. Depends on your comfort level.)
2. Create a new edit method.
3. Add a check box control on Customer Details form (Forms\CustTable).
4. Add a new button to display the information of marked records.

Lets begin:
1. In class declaration of the form declare a map.


2. In the init method of the form , we will initialize this map 


We'll use RecId as the key and AccountNum as the value.Hence the first parameter in map initialization is of type Int64 and second parameter is of type String.

3. Under the methods node of \Forms\CustTable\Data Sources\CustTable, create a new edit method as shown below . 
As we have created this edit method under a form datasource method node we have to provide 3 parameters:
    a) Boolean  - this is used to determine whether the user has entered anything into the control.
    b) CustTable - parameter for the datasource.
    c) Boolean - as the return type of edit method is boolean so the 3rd parameter should also be of type boolean. This holds the boolean value that the user has entered into the control.


Lets understand the logic mentioned in the ablove slide for the edit method.
If the user has amended the value of check box (if(_set)) then:
a)      If user unmark a check box (if(!_mark)) then check if the RecId of unmarked CustTable record exists as a keyvalue in the map. If it exists then remove the corresponding keyvalue (RecId) from the map.
b)      If user mark a check box (else part) then insert the RecId as keyvalue and AccountNum as valuevalue in the map for the marked CustTable record.
Return a boolean: true if the RecId of the current record exists in the map as a keyvalue, false if it does not exists.
Exists method of a map always returns boolean.

4. Now we add a new check box control in the form design and set the properties as shown below. 


5. Now we need a new function to display the information(valuevalue i.e AccountNum) of the records marked by the user. In this function we will iterate through the map(paMarked) using mapEnumerator class and display the information to the user. We can also use mapIterator class for this purpose.


6.Last step is to create a new button on the form, define properties and call the above function(paShowMarked) on its clicked event.


7. Now we are ready to run the process J. We open the customer details form, notice that there is a new check box (Mark) in the overview grid.Now we mark some of the records and then click on show marked button.
An InfoLog will display the AccountNum of all the marked records.


But this is not all. There is lot more to do with the edit methods.
In coming days I'll continue with our journey of edit and display methods .

Until then....
Keep exploring the depths of AX!!!

Thursday 31 May 2012

Ax 2012 : Edit model manifest properties using Axutil

We can edit the model manifest properties like name,version number,description and publisher by using Axutil commands. In this post I'll create a new model and then edit its version number by using Axutil command.

1. Create a new model : In order to create a new model, go to Tools --> Model Management --> select Create model as shown below.


A new Create model form will open and here we can specify model properties. 
Note - I have given version number as 1.0.0.0. We will change this later.


2. Open command prompt: Now an easy way to open the command prompt to execute axutil commands is to navigate to the bin folder of the server and press shift and right click on the folder. A menu will be displayed. From the menu select open command window here:


Now you will see the following screen.


3. View existing models: In order to view the list of all the installed models we need to type the following command : axutil list


4: Edit the property: The syntax of the command used to edit the properties of a model is as following:
axutil edit /model:<modelname> /manifest:PropertyName=Value 


Now we type the command to edit the manifest property "Version" and assign a new version number: 1.100.3205.500
(P.S. --> Property name in the command is case sensitive. In case you type the property name as "version" then it gives an error. Also, we can specify the model Id instead of model name in the command.)


5. Check the updated version number : Now we again list the models to see the updated version number of the model


In this post we have seen how we can edit the value of a model property using axutil.


Refer to the below MSDN link to see the details of the axutil edit command
http://technet.microsoft.com/en-us/library/hh433512.aspx

Wednesday 4 April 2012

Hi Friends,

I am Priyanka, working in IT sector since 2006 and working for Microsoft Dynamics AX since 2010. I developed a deep interest in this domain, still learning this technology and have recently cleared certifications on AX2009 and AX2012.

I have started this blog post to keep posting my learning and code snippets of Dynamics AX aiming to provide some valuable information to understand basic concepts of Dynamics Ax

I believe that sharing knowledge is a very powerful tool which helps us to learn and grow. 

I also aim to learn and improve from your feedback and comments so please do drop your comments or feedback when you come across this blog as that will help me to improve and in turn makes dynamics Ax community more efficient.

So keeping the above on mind.....I'll start posting soon on dynamics AX.

Cheers.